

Congratulations on buying your Ring doorbell. It’s a great step for those who value safe home security and want to ensure they and their families are safe and sound.
The Ring doorbell is an excellent smart gadget that records when motion is detected to help secure your property and let you know when someone is at the door.
To mount and install a Ring doorbell outside, preferably, you need to have T6 (torx 6, 1.70mm) for a smaller screw size or T15 (torx 15, 3.27mm) screws for a bigger screw size, with a T6 or T15 screwdriver.
We will learn more about the sizes and installation of Ring Doorbells in this article, so keep reading to know more about it.
Let’s get started!
By continuing to use this website you agree to our Terms of Use. If you don't agree to our Terms, you are not allowed to continue using this website.
Overview of Ring Doorbell
Thieves have attempted to steal Ring doorbells by removing them from their location on the wall or door. However, there is a way to prevent this from happening.
Two different kinds of screws are used to secure the Ring doorbell: a regular wood screw for installation and a special T6 security screw for the faceplate. The third screw, which is less often used, is for fastening the doorbell to a bracket. These screws’ sizes all differ across models.
The key distinction between the many doorbells sold by Ring is whether they are battery-operated or hardwired into the house’s electrical system.
Hardwired doorbells include the Ring Doorbell Pro, Pro 2, and Wired; battery-operated doorbells include the Ring Doorbells 1-4 (including the 3 Plus and 4 Plus).
All current Ring doorbells record in full HD, all provide motion-activated recordings, none offer 24/7 recording, and they offer additional capabilities through the paid-for Ring Protect plans. The majority of Ring doorbells differ only in their power supply.
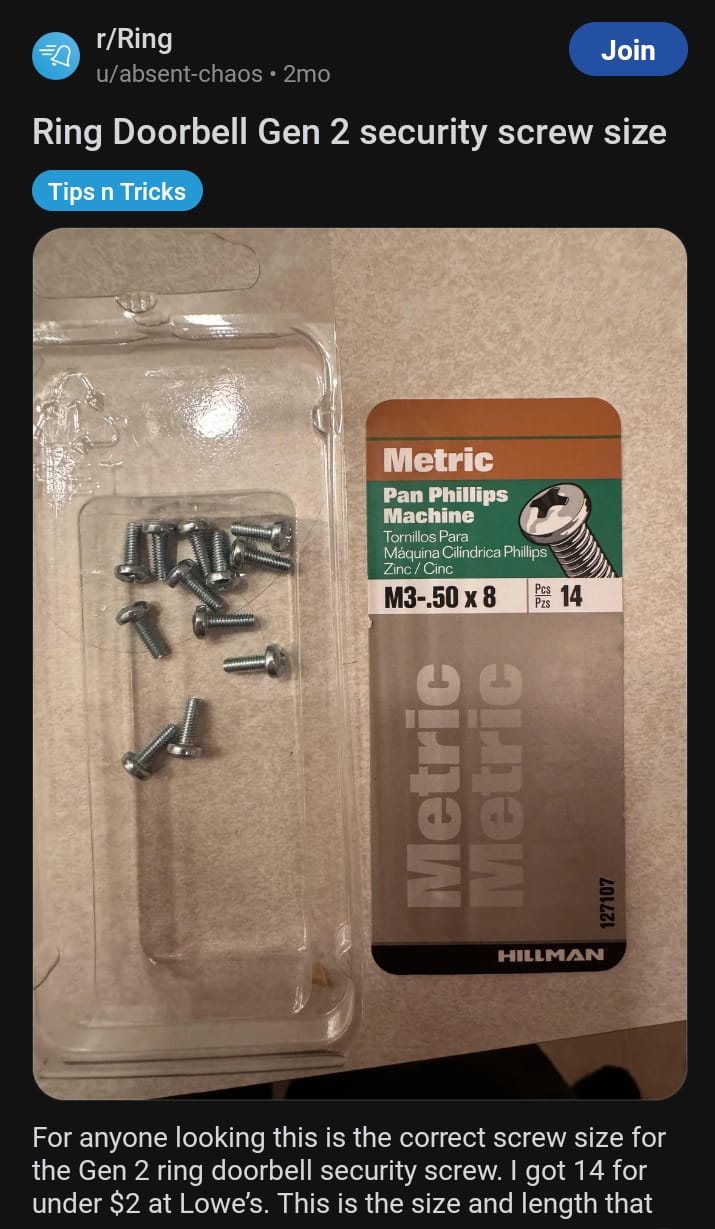
The battery-operated Ring doorbells need a slightly longer security screw than the hardwired ones, which is one (albeit small) distinction between both types that we’ll go into more depth about later.
Did You Know Ring cameras do not support mobile hotspots or Bluetooth and are only designed to work with WiFi networks?
What Type of Screw Is Used in the Ring Doorbell?
An ordinary Phillips-head screw can be used to install the Ring Doorbell on the outside of your house. The kind of Ring Doorbell you have will determine the size of the screw required for installation.
You need a T6 (torx 6, 1.70mm) for the Ring Doorbell and 2. You will want a T15 (torx 15, 3.27mm) screw that is a little bit bigger for the Ring Doorbell Pro.
To achieve a safe and solid installation, it’s crucial to choose the right size screw.

The Various Forms Of Screw That Doorbells That Ring Need
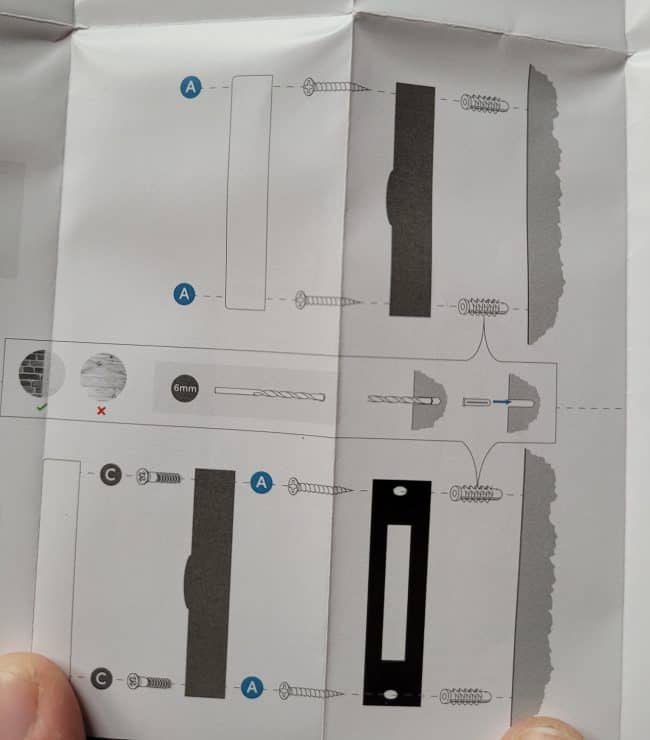
Installing your Ring doorbell involves placing it on the wall or door and covering it with the faceplate. Different types of screws are needed for each step involved in the installation process.
For instance, the first step includes attaching a mounting bracket to your door or wall, or it may just involve screwing your Ring doorbell directly to the surface.
The two wood screws are inserted into the top and bottom of the Ring doorbell. Use wall anchors or plugs to attach it to a sturdy surface before screwing into it.
If you want to use a bracket instead (such as a corner bracket), you must first install the bracket to your wall or door before attaching the Ring doorbell. Then, you would need to use an additional screw (marked “C”).
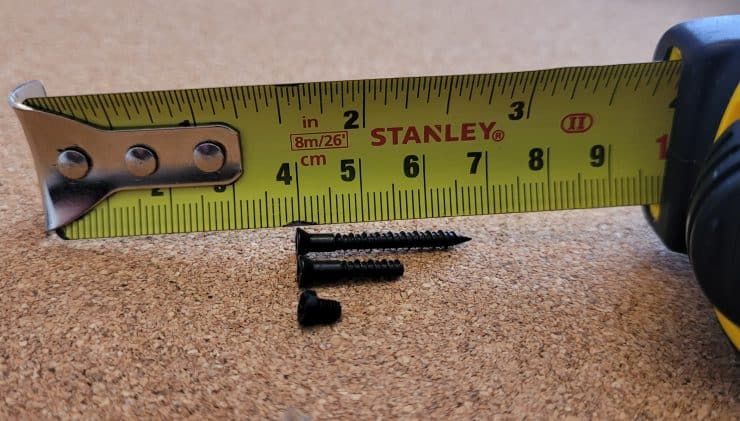
A crosshead 8 ga (5/16′′) wood screw is needed to mount the doorbell itself. However, it should always be included in the package.
Naturally, leaving these two mounting screws exposed to view wouldn’t be particularly secure; a thief might just unscrew it and flee with your Ring Doorbell.
Due to this, Ring has developed faceplates that, importantly, fit over the Ring Doorbell and conceal the two mounting screws.
The faceplate is then fastened in place using a T6 Torx security screw, which is inserted into the bottom of the doorbell.
Although Ring refers to them as “security screws,” there is nothing magical about them since a T6 screwdriver can be purchased simply to remove them.
The following image displays the various screw heads (the mounting and bracket screws all have the same crosshead size, but the security screw has a T6 torx head):
Getting Ready for Installation
It is now time to get ready for installation after determining the right size screw for your Ring Doorbell.
To install the doorbell mount, you must first remove any existing screws or hardware that may be in the area.
If required, carefully remove each one from its mount using a screwdriver and/or pliers until it is free. When trying installation, take care not to harm any of the nearby wall materials, as this might cause issues in the future.
Before starting the installation, ensure that all connections are linked correctly. This includes power cables (if necessary) and any other parts, such as brackets or wires, that must be attached to your current wiring configuration.
Ensure nothing is harmed while removing or installing these components; if anything goes wrong at this stage, call customer service immediately!
Finally, remove any possible dirt to produce a flat surface to connect your Ring Doorbell mount firmly.
Setting up The Ring Doorbell
After gathering all the required materials, it is time to start the installation process.
Drill
Drilling two holes into the door frame or wall that is the proper size for your mounting screws comes first (see above).
Before drilling, measure out the locations of these holes and mark them with a pencil to guarantee precision when mounting your mount afterward.
Insert bolts
After drilling, insert each bolt included with your Ring Doorbell kit with the surface using a flathead screwdriver or another tool.
Tighten the screws
The mounting plate provided in your package should next be attached by carefully positioning it over each hole and tightening down each of its screws.
A decent rule of thumb is finger-tight plus half a turn more for optimal security without running the risk of harm from over-tightening.
Be careful not to overtighten as this might cause damage. The doorbell device may now be attached after everything has been fixed into position.
Make alignment
Simply align its backside with the screw slots on the installed plate’s corners and push hard until it snaps into place to achieve this.
If necessary, use the proper instrument, such as pliers or needle nose grips, but again, be careful not to exert too much pressure as this might result in the component being damaged during installation.
Before concluding the setup, make sure everything seems safe and functional.
| Use the provided hardware: | The Ring Doorbell comes with all the necessary mounting hardware and screws for installation. It’s important to use these screws rather than trying to find your own. The provided hardware is specifically designed for use with the doorbell and is the best option for ensuring a secure installation. |
| Choose the right location: | The Ring Doorbell relies on a strong Wi-Fi signal to function properly. Before installation, it’s a good idea to check the signal strength in the area where you plan to install the doorbell. If the signal is weak, you may consider installing a Wi-Fi extender or moving the doorbell to a different location. |
| Check the Wi-Fi signal: | The Ring Doorbell relies on a strong Wi-Fi signal to function properly. Before installation, it’s a good idea to check the signal strength in the area where you plan to install the doorbell. If the signal weakens, you may consider installing a Wi-Fi extender or moving the doorbell to a different location. |
| Follow the instructions: | Finally, it’s important to follow the installation instructions provided by Ring carefully. The instructions will guide you through installing the doorbell and ensure that it is installed correctly and safely. |
Troubleshooting Installation
If you’ve done everything suggested above and your Ring doorbell installation still gives you problems, there could be another problem.
The power source giving energy to your gadget must have a 16V AC or above voltage, according to the first item to verify. Otherwise, it won’t be able to start up and work properly.
This may be verified by measuring the output voltage with an accurate multimeter or other instrument to detect electrical current.
Connections between components are another potential source of installation problems; if any of these were connected (or detached) incorrectly during setup, they must be repaired before continuing.
To accomplish this, begin by disengaging each component one at a time and carefully inspecting them for indications of wear or corrosion; if either is present, replace that part as soon as possible!
Additionally, ensure that all cables are well secured on both ends so that no connection points inevitably loosen and cause your doorbell system to break or malfunction.
As a last resort, contact customer service for assistance in addressing any issues that may still exist after attempting everything else listed here today if none of these tests uncover the root problem of why you can’t install your Ring Doorbell successfully.
Ring Door Bell Facts and Insights
- Ring doorbells offer many features, including HD video, night vision, two-way talk, and motion detection.
- Ring doorbells can be battery-powered or wired into your existing doorbell system.
- Ring doorbells integrate with other smart home devices, such as security cameras and smart locks.
- Some concerns exist regarding privacy with Ring doorbells, as they can collect video footage of public spaces.
- Ring offers various subscription plans that provide additional features, such as cloud storage for video recordings.
FAQs:
The Ring Doorbell comes with how many screws?
Two security screws and four wood screws are included in the product box. The mounting bracket is attached to your door or wall using wood screws.
How big of a screwdriver must I take a Ring doorbell apart?
Doorbells Have Two Security Screws of Various Sizes. For larger-size screws, use a T15 screwdriver bit. For little screws, use a T6 screwdriver bit.
What is included in the Ring doorbell package?
A screwdriver, screws, a charging cord (if necessary), and installation instructions are all included in each Ring doorbell kit, which varies in the extras it includes.
Conclusion
- Numerous, more crucial measures must be performed to guarantee proper installation and secure device mounting.
- Installing a Ring Doorbell needs more than just choosing the correct size screw for your wall. Before starting, make sure that all of the parts are linked correctly.
- Always drill pilot holes into both sides of the area where the mount will be attached to give it more stability as you tighten each screw. Before mounting the doorbell itself, clear the region of any debris to prevent future interference with its performance.
- Finally, snap it into place using the proper instrument, such as pliers or needle nose grips (but be careful not to apply too much pressure), and then check to see that everything is working before finishing the setup!
- You should have no trouble setting up your Ring Doorbell if you follow these easy instructions.